Saturday, November 9, 2013
Realflow 2013 Demo Videos
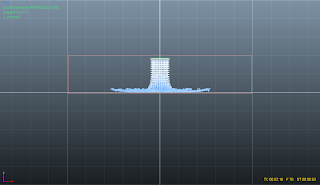
A couple of demo videos, with fluid simulation generated using Realflow 2013
Saturday, September 28, 2013
Friday, July 19, 2013
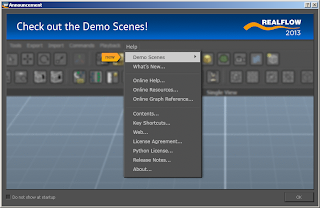
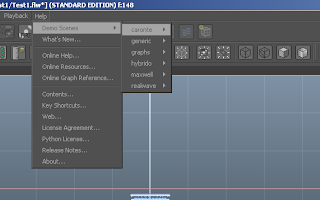
First Look Realflow 2013
Below are screen shots of my first preview look at the latest version of Next Limit's Realflow.
Summary of features: [from Nextlimit website information]


I will be testing some simulations and posting my rendered simulation videos soon.
Summary of features: [from Nextlimit website information]
- Improved Large-Scale Fluid Solver: Hybrido 2
- New base solver for incredible detail.
- New Splash and Foam emitters handled quickly.
- Enhanced Workflow: RealFlow Graphs
- Quick High-Quality Previews: Maxwell Render , with Photorealistc Maxwell Render materials provided
- New File Formats: Alembic
- New file formats allow you greater flexibility in your pipeline and provide efficient data interchange .
- Improved Fracturing Tool
- Improved meshing algorithms: RealFlow RenderKit
- New meshing algorithms mean a much thinner, more detailed mesh.


I will be testing some simulations and posting my rendered simulation videos soon.
Thursday, July 18, 2013
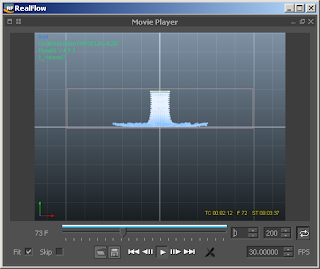
Reaflow Hybrido
Some rendered videos using Realflow Hybrido. Lots of hard disk space 200Gb+ required, time about 2+ days.
Enjoy:
And a none Hybrido video l rendered:
Enjoy:
And a none Hybrido video l rendered:
Saturday, June 29, 2013
3ds max text export for Realflow
Here’s what l do to create objects from 3ds max for import into Realflow. Realfow requires triangulated objects.
Set units to us inches
create a text – eg a simple letter A
Set the size to 1 inch
Apply extrude modifier – value 0.1 inch
Right click on text, select convert to editable patch
Select from the file menu, export selected – choose OBJ, check off Materials, name the target file.
That’s it. The OBJ file can now be imported into Realflow.

Thursday, February 7, 2013
Realflow 101 Notes
I’ve been emailed a lot for this and l decided to put down sort of notes for primarily using Nextlimit Realflow 2012 together with Autodesk Maya 2012.
The focus will be primarily for using Hybrido. Click here for a PDF on Nextlimit Hybrido.
Note – you need a lot of primary fast and large hard drive space for the simulation temporary files which will chew about 200-600+Gb depending on the resolution [higher=more space] you opt for. I use 2 x 1Tb Western Digital Black Caviar drives for drives C, D on an i7 workstation with 32Gb DDR3 RAM.
Also except you own a supercomputer computer simulation takes time, sometimes 5-10+ hours or a couple of days. Be patient for the goal. Use scripts/command line instead of GUI for quicker output when you have a final setup you wish to create/simulate. IF using Windows 7 – turn off unnecessary background services and things like Windows Aero etc. I use Windows Classic XP faithfully on my graphics workstation even though its running Windows 7 Professional version. A decent graphics card is a must – preferrably Nvidia. Hopefully Nextlimit releases a version of this software with GPU support. I use 2 x GTX560Ti with SLI.
Realflow objects map perfectly to Maya, without much or no re-scaling required,
You need to install the Realflow plugin for Maya and activate this in Maya
Maya, Window, Settings/Perferences, Plugin manager

Note – Realflow is CPU and memory demanding as shown below

Below are my quick short notes. Default object settings used unless otherwise mentioned.


1)
Drop in a domain grid. Add a gravity daemon.
Resize this to 10 x 10 x 30 ie Height x depth x width – this just makes a wider tank.
Add a Kill Volume Daemon just a big under the entire volume size of the grid domain.
From the Grid fluid menu – GFM, add a GFD – grid fluid domain
Simulate
GFD, nodem simulation, cache
2)
Drop a Grid Fluid Splash – GFS
Reset, Simulate
GFS, node, simulate, cache
3)
Disable gravity
Add Grid fluid foam
reset, yes, simulate
Cache this like in previous steps
4)
>> Meshing <<
Add particle mesh Render Kit – PMRK
Insert emmiters - splash and gridfluidemitter
Set polygon size and emitter(s) radius site to to 0.1
on node particle render kit, check display mesh on viewport, and make sure build is set to yes
reset
simulate
uncheck display mesh on viewport
set build to no
5)
Mesh foam particles
Add another particle render kit
add Grid fluid foam to it
Set polygon size and emitter(s) radius site to to 0.1
on node particle render kit 2, check display mesh on viewport, and make sure build is set to yes
reset
simulate
uncheck display mesh on viewport
set build to no
6)
Using Realflow plugin we will now bring in the meshes into Autodesk Maya or 3dS Max for rendering.
Note – with this low default resolution setting for the grid domain, after all the simulation processes above, my project file folder used space was 78Gb. If you up the grid domain resolution to say 4 million, you will possibly need about 300-700+Gb storage space for files generated mainly in the particles folder in your realflow project folder.
Screenshots:


Subscribe to:
Posts (Atom)